Rachel Wright

  • Resume
  • AWS
  • General
  • How-tos
  • Security

How to Create a Custom Labels Model in Amazon Rekognition

Published: Tue 28 December 2021
By Rachel Wright

In AWS.

Amazon Rekognition offers image and video analysis capabilities, with a range of out-of-the-box capabilities like facial analysis, facial identification, and object identification. Amazon Rekognition Custom Labels allows you to take Rekognition's ability to identify images and build machine learning models on collections of images.

Getting Started

From the AWS Console, navigate to Amazon Rekognition, and select "Use Custom Labels" from the left menu. From the left menu of the Amazon Rekognition Custom Labels page, select "Projects". If you haven't yet created any projects, you will first be prompted to allow Rekognition to create an S3 bucket. Click "Create S3 Bucket". This will create a bucket in your currently selected region.

Create a Project

The first step is to create a new project, which is done by clicking "Create project" (these are the brilliant insights you come here for). All you need for a project is a name, so it's pretty simple.

Add a Dataset

The project needs a dataset, so the first task will be to "Create dataset". There are two options for creating a dataset: the simplest option is to use a single dataset (the default choice). If you do this, Rekognition will automatically split the dataset into training and test subsets. Alternatively, if you already have a dataset split into training and test sets, you can select to create the dataset that way.

There are also multiple options for where to load your data from. While you can upload them driectly from your machine, I've found this approach to be unreliable, probably because image files can be on the large side. This approach is also limited to only 30 files. There are also other benefits to loading from an S3 bucket, as we'll see later.

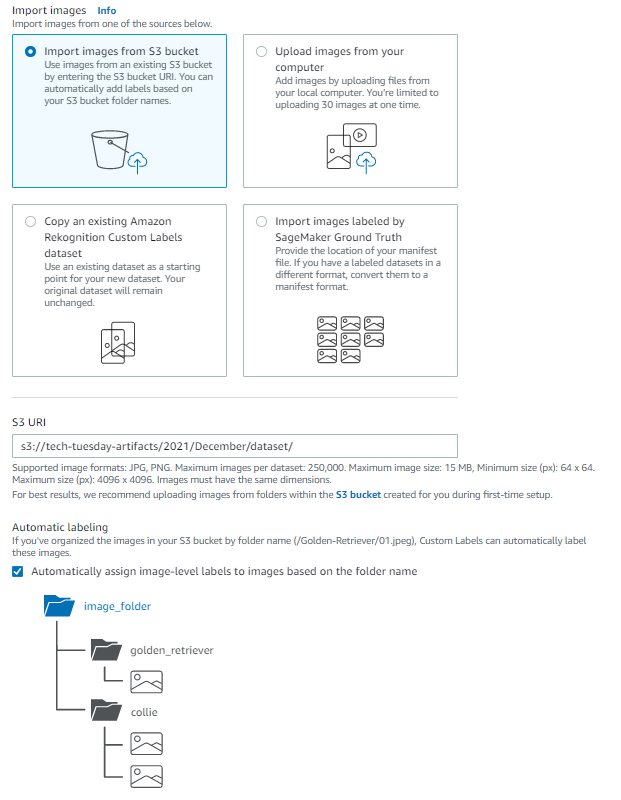
So for a new project with a new dataset, we will load images from an S3 bucket. One significant benefit to loading images this way is the option for automatic labeling. This option will use the folder structure of the S3 bucket to infer label for the image files. Ensure the S3 URI includes the apprpriate prefixes so that the labels can be identified (such as in the example below, where the files are located in a folder named "dataset"):

Load Dataset from S3

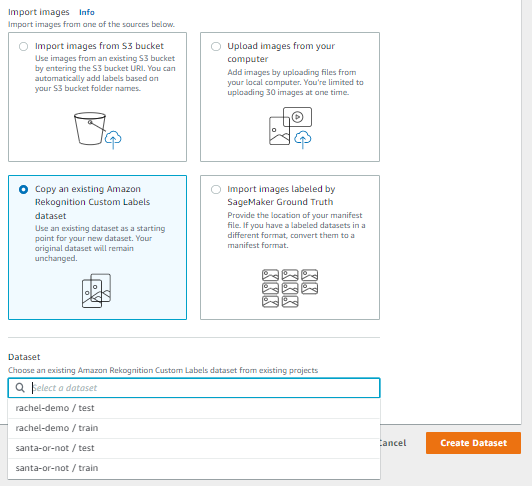
If you already have a project with a dataset (in the same account and region) and want to reuse that dataset, Rekognition also offers the option of creating a dataset using an existing dataset. When you select this option, the available datasets will be shown in a list:

Load Dataset from Existing Dataset

Finally, you can also load datasets from SageMaker.

Labeling a Dataset

If you didn't use automatic labeling, or want to add additional labels, you can us the "Add labels" feature in the AWS Console. Once you click "Start labeling", you will have the option of assigning either image-level labels, or of selecting an area within an image to attach a label to. Ensure you click "Save changes" prior to clicking "Finish Labeling" to ensure your new labels are applied.

Training the Model

Once your project has a dataset, you can train the model. Model training can take an hour or more, depending on the number of images and labels. Once it's complete, the project will have a model listed in the "Models" pane, and it will have a status of "TRAINING_COMPLETED". You can click on the model name to see some details about the training results:

Model Training Results

The date completed will also show how long the model took to train in hours. The model performance will be described with the F1 score, precision, and recall. These metrics are all indexed to 1, with 0 being the lowest score and 1 being the best. However, it is important to note that even high scores indicate only how well the model will perform based on images represented by the training dataset. For example, if your training dataset includes only images of tree leaves and has an F1 score of .95, it may not do a good job of identifying images of entire trees.

Using the Model

Once the model has been trained, it needs to be started before you can use the model. It may take several minutes to start the model, but once it is started it should respond quickly. A model only incurs fees during training and when running, so it's important to remember to stop your model when you are done with it so that you don't continue to incur fees.

When starting the model, you can manage the throughput level of your model by adjusting the number of "inference units" to be used. Once the model is started, you cannot increase or decrease the number of inference units without stopping and restarting the model.

How to Create a Lambda that Uses Go

Published: Tue 07 December 2021
By Rachel Wright

In AWS.

Go programming language (also known as “Golang”) is a high-performance programming language based on C that originated at Google. Go was designed to natively handle concurrency and take advantage of multiple cores, so it scales horizontally really well. This feature makes it a great fit for AWS Lambda functions. And how could you not love this little gopher?

Go

Installing Go

I installed Go using apt:

sudo apt-get update
sudo apt install golang-go

If you're not sure if you have it installed, simply run go version.

Creating a Lambda in Go

To get started writing Go lambda functions, you will first need to install the lambda Go package, github.com/aws/aws-lambda-go/tree/lambda. The Go installer is go get, so to install the lambda package, run:

go get github.com/aws/aws-lambda-go/lambda

In order for your Go function to run as a lambda, your main package must have a handler as well as a main() function. The handler accepts context and event parameters, and the main() function invokes the handler. The function below is a "hello world" function, so I'm not passing in any event parameters, just a context. To create this lambda, create a directory named src and add a hello.go file with the following code:

package main

import (
    "context"
    "fmt"
    "os"
    "github.com/aws/aws-lambda-go/lambda"
)

func HandleRequest(ctx context.Context) (string, error) {
    var msg = "Hello, world! %s, let's be friends"
    var prm = os.Getenv("USER")
    return fmt.Sprintf(msg, prm), nil
}

func main() {
    lambda.Start(HandleRequest)
}

Deploying the Lambda

I created the Lambda function using the AWS console because it will automatically create the required role. When you create the function, select "Author from scratch", and choose "Go" as the runtime.

To deploy my code, I'll use the AWS CLI. First, we compile the code, then zip it. Then I update the lambda function code from the zip file. I'll also add an environment variable named "USER" since it's referenced in my little sample function.

go build src/hello.go
zip hello.zip hello
aws lambda update-function-code --function-name "go-hello" --zip-file fileb://hello.zip
aws lambda update-function-configuration --function-name "go-hello" --environment Variables={USER=Rachel}

Now that the code is deployed, we'll test it out:

aws lambda invoke --function-name "go-hello" response.json
cat response.json

Resources

Building Lambda functions with Go

How to Add Single Sign-On to your AWS Account

Published: Fri 19 November 2021
By Rachel Wright

In AWS.

AWS offers single sign-on (SSO) at no charge, and setting it up can simplify your login experience, especially if you have more than one account.

  1. Log in as the root user in your account. Navigate to "AWS Single Sign-On" and click "Enable SSO". It will take a few seconds to set it up, then you will see a message that says that SSO has been successfully enabled. Now you can select "AWS accounts" on the left menu. You should see your account on the "AWS organization" tab.
  2. Next, you will need to create permission sets on the "Permission sets" tab. Click "Create Permission Set" and on the first page of the wizard, select "Use an existing job function policy". On the next page, select "AdministratorAccess" and click through the subsequent tabs to create the permission set. Do the same to create permission sets for "PowerUserAccess" and "ViewOnlyAccess", too.
  3. Now you can create users for logging in. If you're planning to add multiple users to your account, it's advisable to create Groups to assign to permission sets and add your users to the relevant groups (e.g., Administrators, PowerUsers, ReadOnly). I'm performing these steps for my personal account, so I will grant access directly to my User. Select "Users" on the left menu and click "Add user". The username can be an email address, but doesn't have to be, but an email address can only be used for one user in the account. If you created any Groups, you can add the users to groups, but this step is optional.
  4. Once you have created your Users (and Groups), return to "AWS accounts" from the left menu so that you can assign them to your account. On the "AWS organization" tab, click the checkbox next to the account, then click "Assign Users". On the first page of the wizard, select the Users and/or Groups to assign; on the second tab, select the Permission sets they will be granted (can be more than one), then click "Finish".
  5. Finally, if you want to set up a custom login url, click "Settings" on the left menu and edit the "User portal URL". You can also adjust the MFA settings on this tab.

The user(s) you created will receive a verification email, and once the account has been verified, you'll be able to log in using the address you set up for your user portal. Once you've logged in, you'll be able to select from the permission sets you created and access the AWS Console or CLI. For example, for my AWS account I've added the signon portal rwright.awsapps.com, and added my newly created user to all three permission sets. After I log in, I see something like this:

SSO Portal

Hooray! I can log in as an IAM user without having to remember my account id!

Resources

AWS Single Sign-On

How to Set Up AWS Git Credential Helper

Published: Thu 18 November 2021
By Rachel Wright

In AWS.

If you use AWS CodeCommit as your version control repo, you may want to set up a credential helper so that you can easily sync your code from VS Code. Fortunately, the AWS CLI includes just such a credential helper.

Setting up the AWS CLI Credentials

To check that you have the AWS CLI installed and view the existing configuration of your AWS CLI, run:

aws configure list

This will show the variable values for the default profile. It also lists where your config file is stored. If your configuration is empty, you can either edit the file directly or provide the values interactively by running aws configure. To set up a specific AWS CLI configuration profile, add the --profile switch and value to the aws command, for example: aws --profile myProfile configure.

Setting up the Git Client to use the AWS Credential Helper

Once you have the configuration set up, you need to connect your git client to the credential helper. You have several options for this: you can connect your git client globally, so that the same credential helper is used for all git calls, or you can connect a specific repo to the credential helper. For any connection to the credential helper, you can also specify an AWS config profile (if one is not specified, the default profile will be used).

Git Global Set Up

To globally connect your git client to the AWS CLI credential helper, run the following:

git config --global credential.helper '!aws --profile myProfile codecommit credential-helper $@'    
git config --global credential.UseHttpPath true

If you want to use the default profile, you can omit the --profile switch and value. Now you should be able to go to Code Commit, copy the HTTPS clone endpoint, and clone the repository using git clone https://git-codecommit.us-east-1.amazonaws.com/v1/repos/my-repo-name.

Git Local Set Up

If you want to keep your current credential helper for all other repos but use the AWS CLI credential helper for a specific repository, you can configure the credential helper for the current repository only. Since this setup is specific to a repo, you will have to have an initialized repository set up, rather than simply cloning from Code Commit. To do this, navigate to the directory where you want to store the code, and run git init. Now, you can set up the local credential helper. The process is the same as for the global setup, except that you replace the --global switch with --local:

git config --local credential.helper '!aws --profile myProfile codecommit credential-helper $@'    
git config --local credential.UseHttpPath true

To connect your local repo to the Code Commit repo, add the HTTPS clone endpoint as a remote origin, and map the local and remote branches:

git remote add origin https://git-codecommit.us-east-1.amazonaws.com/v1/repos/my-repo-name
git branch --set-upstream-to=origin/master master

You should now be able to run git fetch and git pull to populate the repo!

How to Set Up your Project with CDK and Amplify

Published: Fri 29 October 2021
By Rachel Wright

In AWS.

AWS Amplify can host a web site directly from a source code repository, such as git or AWS Code Commit. The AWS Cloud Developer Kit, or CDK, makes it easy to create and deploy site without ever having to log in to the AWS Console.

Prerequisites

This post describes how to deploy existing code for a website. For this example, the steps assume that the code is in a CodeCommit repository.

You will also need the AWS CLI installed. For instructions on installing the AWS CLI, see here: https://docs.aws.amazon.com/cli/latest/userguide/cli-chap-install.html

Steps

  1. Install the CDK if you don't already have it. It can be installed with npm using npm install -g aws-cdk. To confirm that the installation was successful, check the installed version by running cdk --version.
  2. Create a directory for your CDK project and navigate to that directory. In the new directory, run cdk init --language typescript. This will create a Typescript project with a blank stack. The stack definition can be found in the lib folder, and will be named [directory name]-stack.
  3. We want to use an existing Code Commit repo, so we will need the Code Commit CDK module. To install it, run npm install @aws-cdk/aws-codecommit. To add the repository to the stack, open the stack file and add the following:

    import { Repository } from '@aws-cdk/aws-codecommit'
    
    const repoName = 'my-repository-name'
    const repo = Repository.fromRepositoryName(this, 'MyRepo', repoName)
    
  4. To create an AWS Amplify app, start by adding the Amplify CDK module: npm install @aws-cdk/aws-amplify. Now we can create the app in our stack by adding the following to our stack file:

    import { App, CodeCommitSourceCodeProvider } from '@aws-cdk/aws-amplify'
    
    let amp = new App(this, 'MyBlogApp', {
          sourceCodeProvider: new CodeCommitSourceCodeProvider({ repository: repo })
        })
    
  5. To use a Code Commit repository as the source for an Amplify app, we need to designate which branch of the repo it should use. We also need to add an address to be used:

    let master = amp.addBranch('master')
    let domain = amp.addDomain('example.com')
    domain.mapRoot(master)
    
  6. To check that your stack definition is valid, run cdk synth. If this is successful, you can deploy to AWS:

    cdk deploy
    
  7. The new Amplify app will be automatically configured to build and deploy whenever a change is checked in to the source repository. To see it in action, push a change to your repository. Once the build and deploy process has completed, you should see your new site at the address you provided!

Resources

AWS CDK API Reference

How to Configure AWS CLI

Published: Tue 26 October 2021
By Rachel Wright

In AWS.

The AWS CLI uses configuration settings and credentials stored locally in the folder .aws, in files named config and credentials.

The settings in the files are divided into profiles, identified with a profile name in brackets. For example, consider this samlpe .aws/config file:

[default]
region = us-east-2

This indicates that the region for the default profile is us-east-2.

Creating the default settings

To set up the default config and credentials file, run the aws configure command. This will prompt you to enter your AWS Access Key Id, your AWS Secret Access Key, a default region and a default output format.

Profiles

The AWS CLI enables settings to be grouped into profiles, so that you can use multiple accounts or credentials. To create a new profile, run aws configure --profile my-profile. You will again be prompted for the config settings and credentials to be used for this profile.

To specify a profile when running an AWS CLI command, include --profile my-profile in the command. For example, the following command will list all S3 buckets in the account identified by the default profile:

aws s3api list-buckets 

To view the S3 buckets in my-profile, adjust the command as below:

aws --profile my-profile s3api list-buckets 

Resources

AWS Access Keys

For information about how to create and manage AWS access keys see: https://docs.aws.amazon.com/IAM/latest/UserGuide/id_credentials_access-keys.html

AWS CLI Commands

For information about available AWS CLI commends see: https://docs.aws.amazon.com/cli/latest/reference/

Proudly powered by Pelican, which takes great advantage of Python. Hosted by AWS Amplify